Nov 25, 2012

Baby Shower Gift- Baby First Aid Kit!!

so.. I realize I'm totally sporadic with my posts- and that's just how it's gonna be. I'm not obsessed with this blog thing, but every once in a while, there comes something I'd like to share. For example- the baby shower gift I put together! 
Baby First Aid Kit!!
New moms and dads don't think about the medical necessities they need when they are busy registering for bobby's and bottles. As a new mom myself, I quickly learned the importance and expense these medicines really are! 
Here's the kit I made:
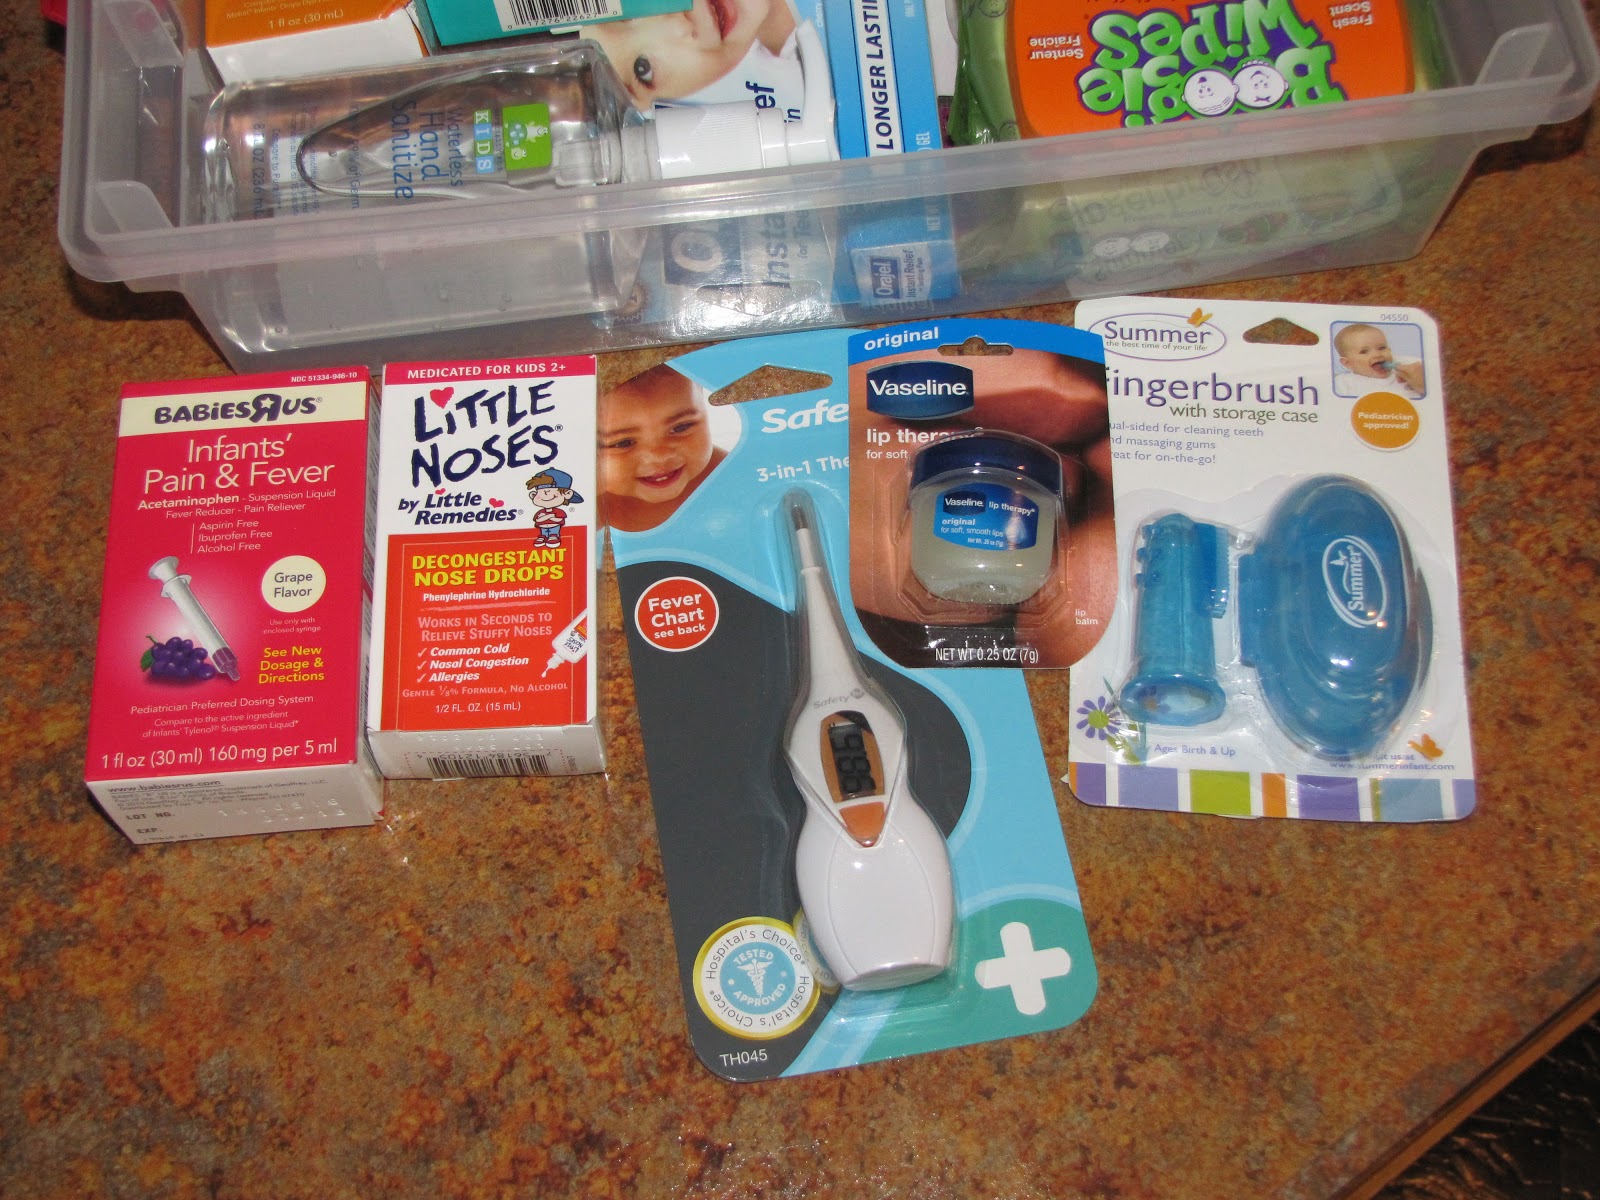
- Infant's Ibuprofen (Motrin)
- Infant's Acetaminophen (Tylenol)
- Little Noses (Saline drops)
- Vaseline (great for red sore skin!)
- Thermometer 
- Bandaids (In a cute kid print of course!) 
- Neosporin
- Children's Benadryl-D
- Baby Q-tips
- Baby Vicks Chest Rub 
- Boogie Wipes
- Orajel
- Boo-Boo Buddy
- Hand Sanitizer
- Finger Brush

Some other things that are great to include are:

- Forehead Thermometer
- Medicine Kit (syringe, medicine spoon)
- Nasal syringe
- Alcohol Wipes


I even added a cute little "Red Cross" on the front that says Baby First Aid Kit! And of course- I picked up a Red-handled Box from Target. :D 


and that's it. Sweet. Simple. Around $60 to $70 dollars if you keep your eye out for sales on things. 

What a Nice Gift! I know that the parents I gave this kit to really appreciated it!! And I know they will truly appreciate it when they have a feverish Teething baby screaming her head off at midnight! ;)

Ang. 

Jul 12, 2012

So today I wanted to share my furniture restore. JW and I found two matching pieces of furniture, from two different locations, (quite the find!) and I transformed them into beautiful pieces for the nursery.  The tall dresser is used for just that, and the long dresser will be used as a changing table.  I love the idea of having a low, long dresser as a changing table, because she will be able to use it afterwards.  What do you do what a changing table.. put it in a yard sale.. that's it.  Anyway, the dressers started out white-ish with gold trim. I sanded them down to remove most of the paint. I used a spray paint primer, and then brushed the small spots and rolled the rest with the Sunshiney-Yellow Paint.  I also removed the hardware and spray painted them with a silver spray paint.  Makes them look brand new! (And I love Spray Paint!) Some of the handles were missing a screw, and BOY! was it hard to find screws that matched!! Who knew!? But JW finally made it work after a few trips to the hardware store.  Machine thread screws with a few tiny washers and the handles were on perfect. These were really fun to re-finish. And i love the way they look in the nursery against the teal walls! 
And here is the finished, completed, put together, in action Nursery! 

:D 

Apr 15, 2012

Welcome Sign!

So here's the Door Hanger I crafted for Our hospital door to Welcome Baby Elle into the world! We got so many compliments on it! People stopped by our room (people there to see other people!) just to say that they loved it. The nurses said that they haven't seen a sign like it! Now, why is that?! I wanted the world to Welcome my Precious Gem! Not to mention find our room when they came to visit! :DI made this Welcome hanger using a matting board (From Michaels), painted it pink then hot glued my signature flowers, buttons, and rhinestones to the edges. Not to mention a few silver trinkets, including an 'E' charm of course. For the banners, I cut out small triangles, chalked one sided heavier than the other with Yellow chalk, and the lettering is just a sparkly sticker. I attached one to the next using the smallest white brad I could find. I wanted the banner to be able to move if it had to, and brads work great for that. All that was left was to hang it with some ribbon. :D The welcome sign is now hanging in our daughter's room. And of course could be used for the next member of the family, but why would I deprive myself of making a new craft!?

Apr 10, 2012

In Your Easter Bonnet!

Happy Easter! Now that I'm a Momma to a Beautiful Baby Girl, I just had to go all Girly for her first Easter! I bought her a very fluffy yellow dress, tulle underlay of course!, and was left with the task of creating her Easter Bonnet. So here's what I came up with!

Materials:
Staw hat (the kind used for displayed glass dolls)
- thank you Hobby Lobby for having this!
ribbon, buttons, rhinestones, & other small
trinkets including a circle brad with the letter E on it.
fake flowers- of the daffodil type (Very Eastery)
and a stretchy headband (white)


Channeling a 1900's style hat, I got to work on my infants headpiece. I love hot glue. I love to scrap with fake flowers and buttons, it's sorta my calling card. So I usually buy full stemmed flowers from Michaels when they are on sale, then tear them apart to use the pieces for my scrapbook pages. For the $1.50 I spent, I'll get way more flower petals than I would buying a canister of flower petals some company put together for $10! For this hat, I left the stems on the flowers so they would hold their shape, but cut them very short. Then started bunching the pieces together. The last thing I did was glue the headband on. I tried to gage where on Elle's head I wanted it to sit, then pasted the headband to the hat accordingly.


And here's the finished product, complete with fluffy sunshine yellow dress.
(And satin white shoes, but you just can't see them.)
The bonnet is meant to be a token piece: purposely small on the head, cocked to the side and worn low towards the forehead.
It turned out just adorable! Everyone loved it!
And more importantly- Elle wore it for a long while on Easter!
Proud to be her Momma!